Events refer to particular occasions, such as concerts, festivals, exhibitions, sports tournaments, workshops, webinars, etc. You can provide customers with unique and relevant shopping options by offering e-tickets to certain events. Customers can purchase tickets online, receive them via email or through a mobile app, and present them at the event venue for entry.
The Events page enables you to view the event details and manage the events available for sale on your website. You can create a new event, set the event product description, etc. The Events page allows you to track events ensuring accurate and up-to-date information available to customers on your online store.
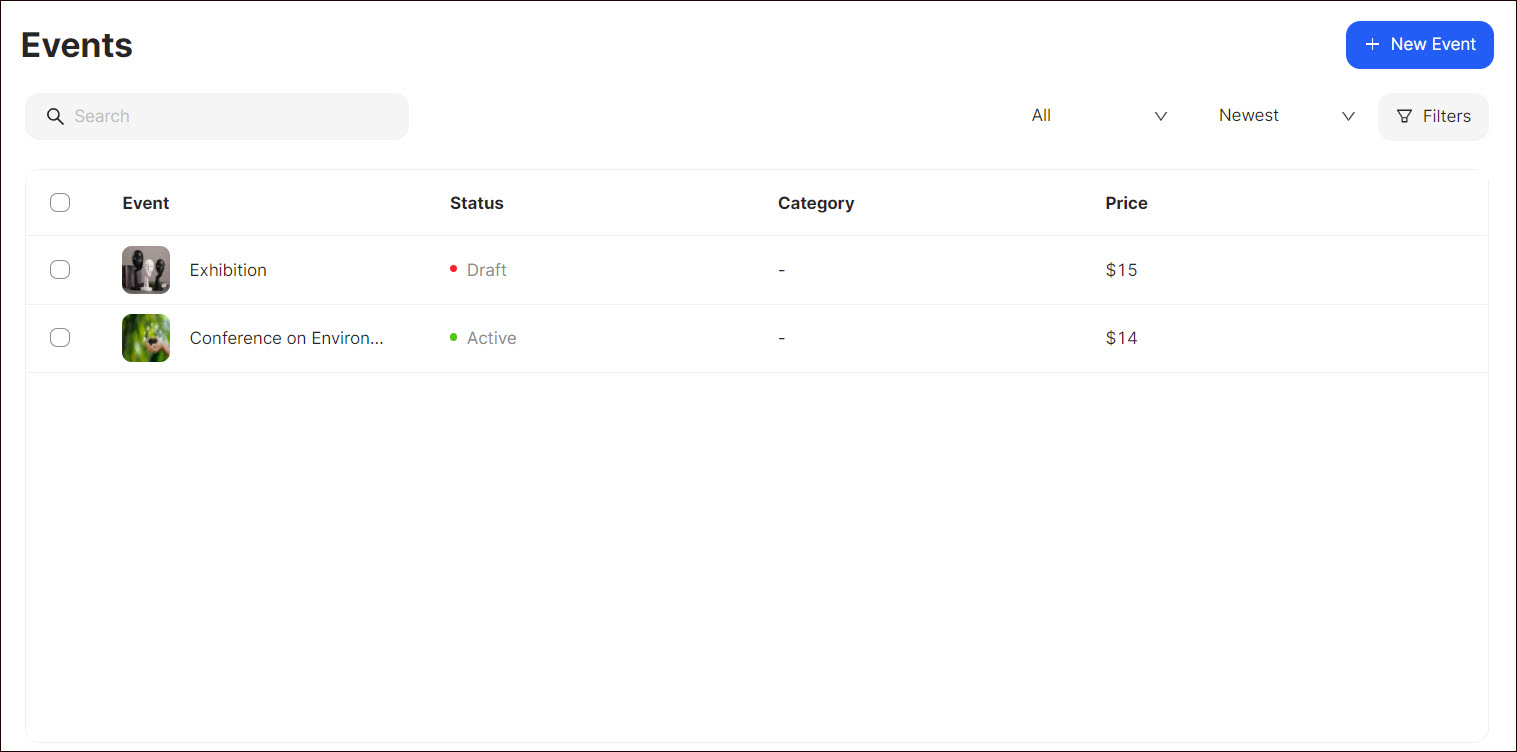
Here you can:
- Search for the respective events.
- Sort the events according to the preferred alphabetical order, creation, or activity statuses.
- Filter the events according to the corresponding criteria.
Tip: To delete or edit events, select the event from the list, click the Dotted Menu, and opt for the appropriate option.
Note: If there is a seat reservation for the event, you will not be able to edit seat and ticket information.
Creating an Event
To create an event:
- Go to Apps and Set up the Ucraft Events & Tickets app from the Ucraft App Store.
- Navigate to Events > Event List on the Dashboard.
- Click + New Event.
- Select the corresponding event type (see Event Types).
- Provide the requested information in the Details section:
- Indicate the event name to be displayed to customers.
- Enter the name of the event organizer.
- Enter a detailed product description displayed to customers or click Generate with AI.
Note: The text is generated based on the title and keywords provided in the description field. - Select the event type from the drop-down list.
- Select the event category from the list (see Event Categories) or create a new category.
To do so, enter the category name in the Category field and click New Category displayed below the field.
Tip: To make the category default, tick the star icon next to the corresponding category. The default category name is generated in the product URL.
- Activate/deactivate Product Visibility to display/hide the corresponding event from the customers.
Note: The hidden event is not visible on the category page and in the product list. But it is visible when accessed through the URL generated in the SEO section.

4. Add product images to the Media section:
Click + Upload and select the corresponding image from the computer.

- Click the settings icon on the image, enter the image title, description, and ALT name in the popup that opens, then click Save.
Tip:
- To make the product image default, tick the star icon on the image. The default image is displayed first on your product page. If no image is set as default, the first uploaded image will be displayed instead.
- To reorder the images, click and hold the uploaded image, then move it to the desired position. The images will be displayed in the same order in public mode.
- To remove the image, click the delete icon.
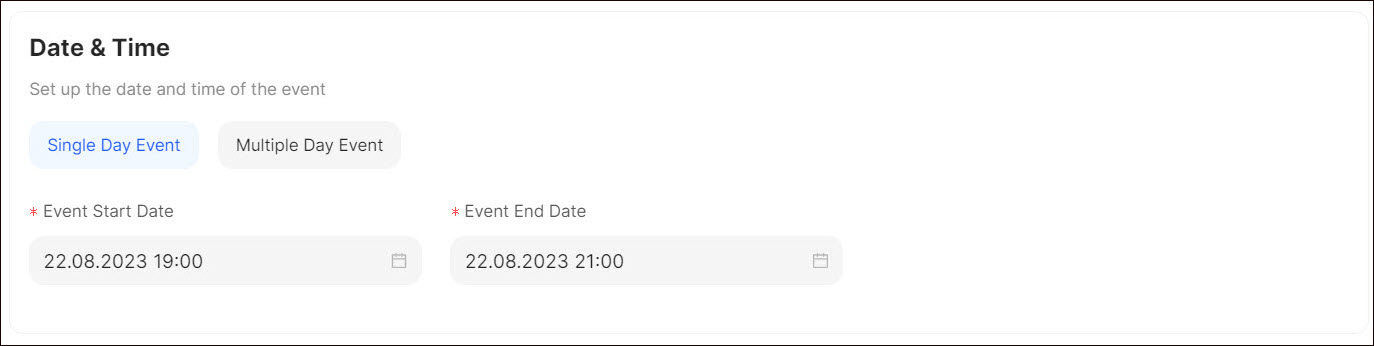
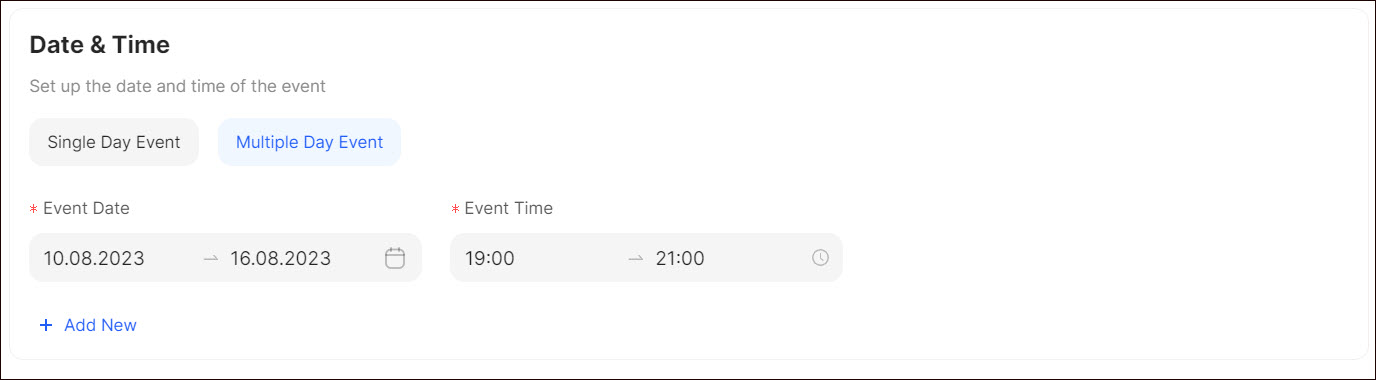
5. Provide the requested information in the Date & Time section:
- Single Day Event - Indicate the event start and end date/time. Such events take place on specific dates and the customers are required to purchase a single ticket for the event (e.g. concerts, stage performances, trade fairs, etc.).
- Multiple Day Event - Click + Add New and indicate the event start and end date/time. Such events are recurring and take place over an extended period (e.g. concert tours, film festivals, tradeshows, and expos, etc.).
6. Provide the requested information in the Event Location section:
- Enter the event link if it is an online event.
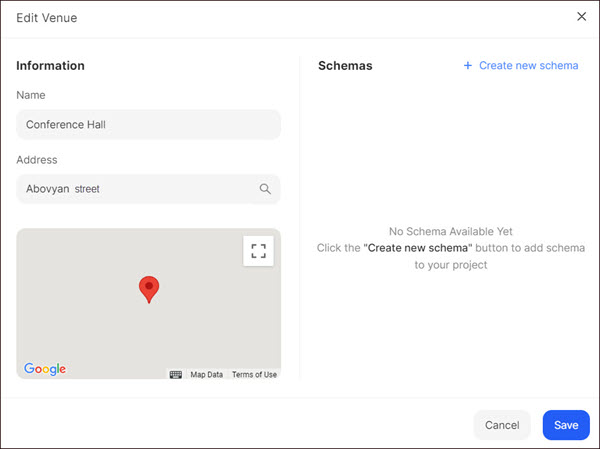
- Select Venue (Schema, if required) from the corresponding drop-down list.
- Click Manage Venues & Schemas.
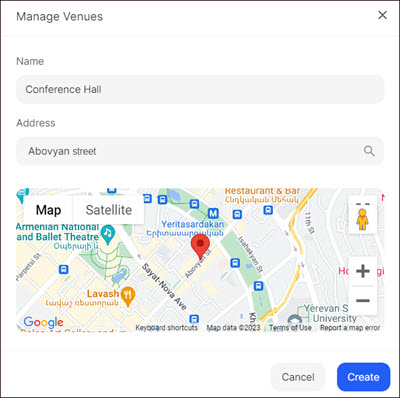
- Click + Create new venue to add a venue to your project. Venues can range from event spaces to conference and concert halls, theaters, sports arenas, and more.
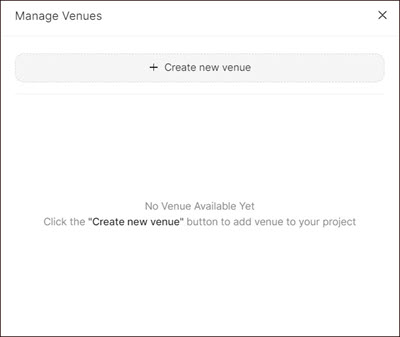
- Indicate the name and address of the venue.
- Click Create.
Tip: To create a detailed layout of your venue, click + Create new schema, create your desired venue layout (see Event Layout Editor), and click Save.
7. Provide the information in the Extra Options section, if you want to offer your customers additional services that can make their event more memorable and tailored to their specific needs.
- Click + Add Extra Option.
- Enter the additional services you offer for your event and indicate the price.
Click Save.
Once you have created extra options, you need to add and configure the Ticket Chooser widget in the Visual Editor to display the options on your website.

Tip: To edit or remove the extra option, click the corresponding icon next to the option

8. Provide the requested information in the Ticket Types section:
- Single Day Event
- Click + New Ticket.
- Indicate the ticket name.
- Enter a ticket description.
- Select Ticket Pricing Option. If the ticket has a fixed price, indicate the price.
- Select Ticket Quantity. If the tickets are limited, indicate the number of available tickets.
- Select the ticket color.
Note: The selected ticket color is visible on the event schema both in Visual Editor and in public mode.
- Click + Add Option.
- Tick the corresponding option to include the additional service in your ticket.
- Enable the toggle to include the service fee in the ticket price.
- Disable the toggle to offer the service as an additional option.
Note: Services included in the ticket are marked in green, while additional services are marked in blue
Tip: Click the x icon to remove the service from the ticket.
- Multiple Day Event
- Select the event date from the right-side drop-down list. You can choose a specific date or assign the ticket to all available dates.
Note: For the selected date you can create several tickets. By default, all tickets are assigned to the All Dates option. - Click + New Ticket.
- Indicate the ticket name.
- Enter a ticket description.
- Select Ticket Pricing Option. If the ticket has a fixed price, indicate the price.
- Select Ticket Quantity. If the tickets are limited, indicate the number of available tickets.
- Select the ticket color.
Note: The selected ticket color is visible on the event schema both in Visual Editor and in public mode.
- Select the event date from the right-side drop-down list. You can choose a specific date or assign the ticket to all available dates.

Tip:
- To view and track the quantity of total and remaining tickets, click Tickets Availability.
- To delete or edit a ticket, hover over the corresponding ticket and select the appropriate option.
- To assign seats to the corresponding tickets hover over the corresponding ticket and select Assign Seats (see Assigning Seats).
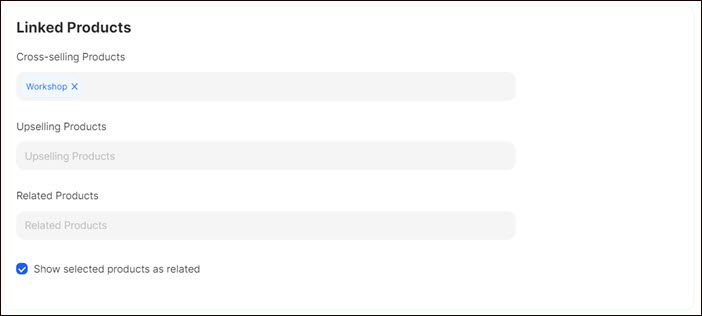
8. Provide the requested information in the Linked Products section:
- Select the corresponding items from the drop-down list related to the event. These items are displayed as a suggestion to a customer during the purchase. They are related to the main purchase and can be beneficial for the customer.
- Select the corresponding items from the drop-down list that are more expensive or are higher versions of the current item. These items are displayed as a suggestion to a customer during the purchase.
- Select the corresponding items from the drop-down list that are related to the event and might interest the customer.
- Tick Show selected products as related if you want the newly created event product to be displayed as a suggestion to the selected as cross-selling, upselling, and related products.
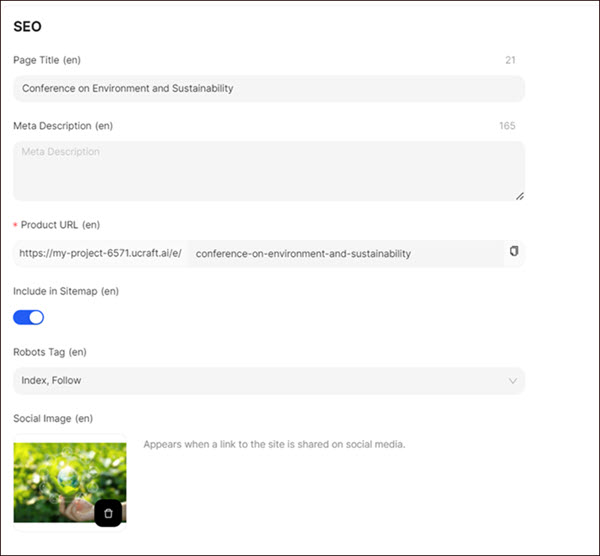
9. Provide the information requested in the SEO section:
- Indicate the page title and meta description.
- Modify the auto-generated URL alias, if necessary.
- Tick the Create a URL redirect checkbox to make the product page available under the updated URL.
Note: If you untick the Create a URL redirect checkbox, customers will be directed to the 404 page. - Activate the Include in Sitemap toggle if you want the product page to be added to your sitemap.
- Select Robots Tag from the respective drop-down list to control how search engines index the product page by search engines and follow the links on them.
- Add a social media image of your product that will be displayed when you share a link to your product page on social media platforms like Facebook, Twitter, LinkedIn, and others.
To do so:- Click + Upload and select the corresponding image from the computer.
- Click the settings icon on the image, enter the image title, description, and ALT name in the popup that opens, then click Save.
Note: If no image is uploaded, the category main image will be applied by default.
10. Click Save.
If your website is available in multiple languages, select the corresponding language from the right-side language drop-down list (see Settings > Languages) and enter event-related information in the selected language.

Once the customers add the event to the shopping cart, they will receive a corresponding email or SMS message (see Settings > Notifications).
Tip: You can indicate whether the customer can purchase the event as a guest or registered user (see Settings > Checkouts).
Once you have created an event, you need to add and configure the corresponding widgets in the Visual Editor to display the event on your website (see Event Product Widgets).
Event Layout Editor
The event layout editor allows you to create and design the layout plans of venues. The editor provides you with quick and easy access to styling tools to modify and customize the floor plan of the event venue. You can create detailed floor plans, design seating arrangements, and visualize how space will be organized for various events.
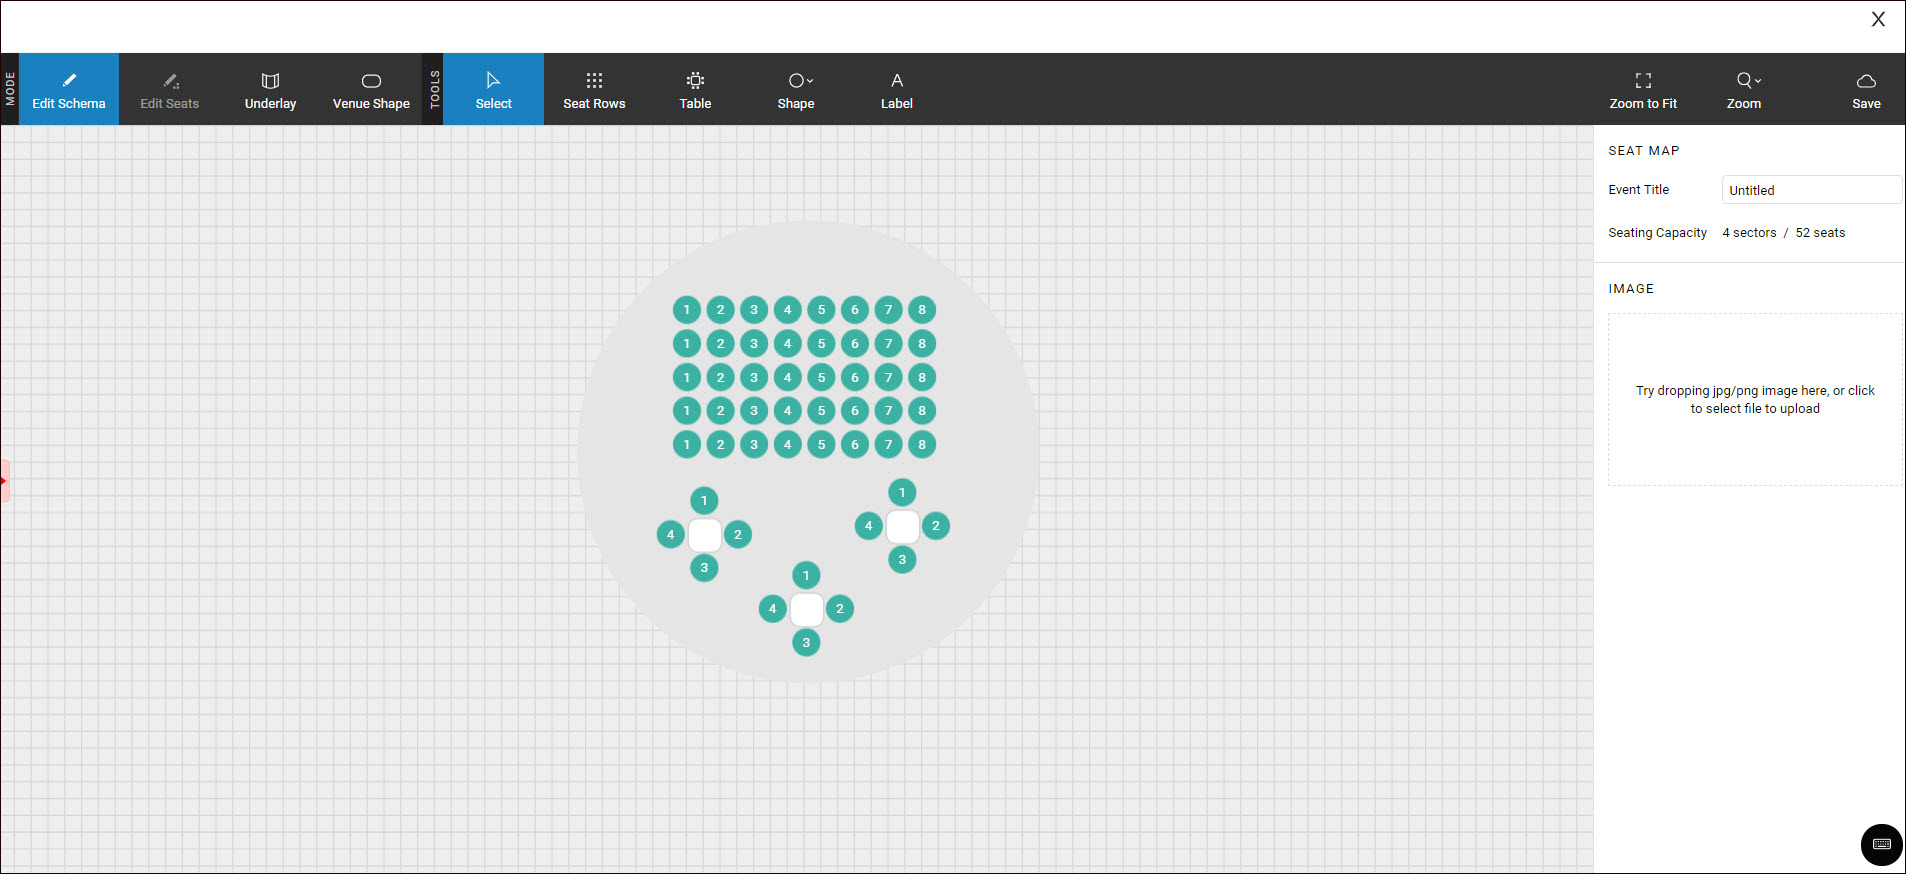
The event layout editor comprises the following units:
- Mode
This unit comprises the general tools that enable you to edit event layouts. You can import or export the background layer of your venue plan, and configure the venue shape by modifying the corresponding design features on the right side of the panel.
- Tools
This unit comprises general tools that enable you to add seat rows and tables. You can modify seat numbers and rows, outline the shape of the venue (Rectangle, Circle, Line), and configure the label.
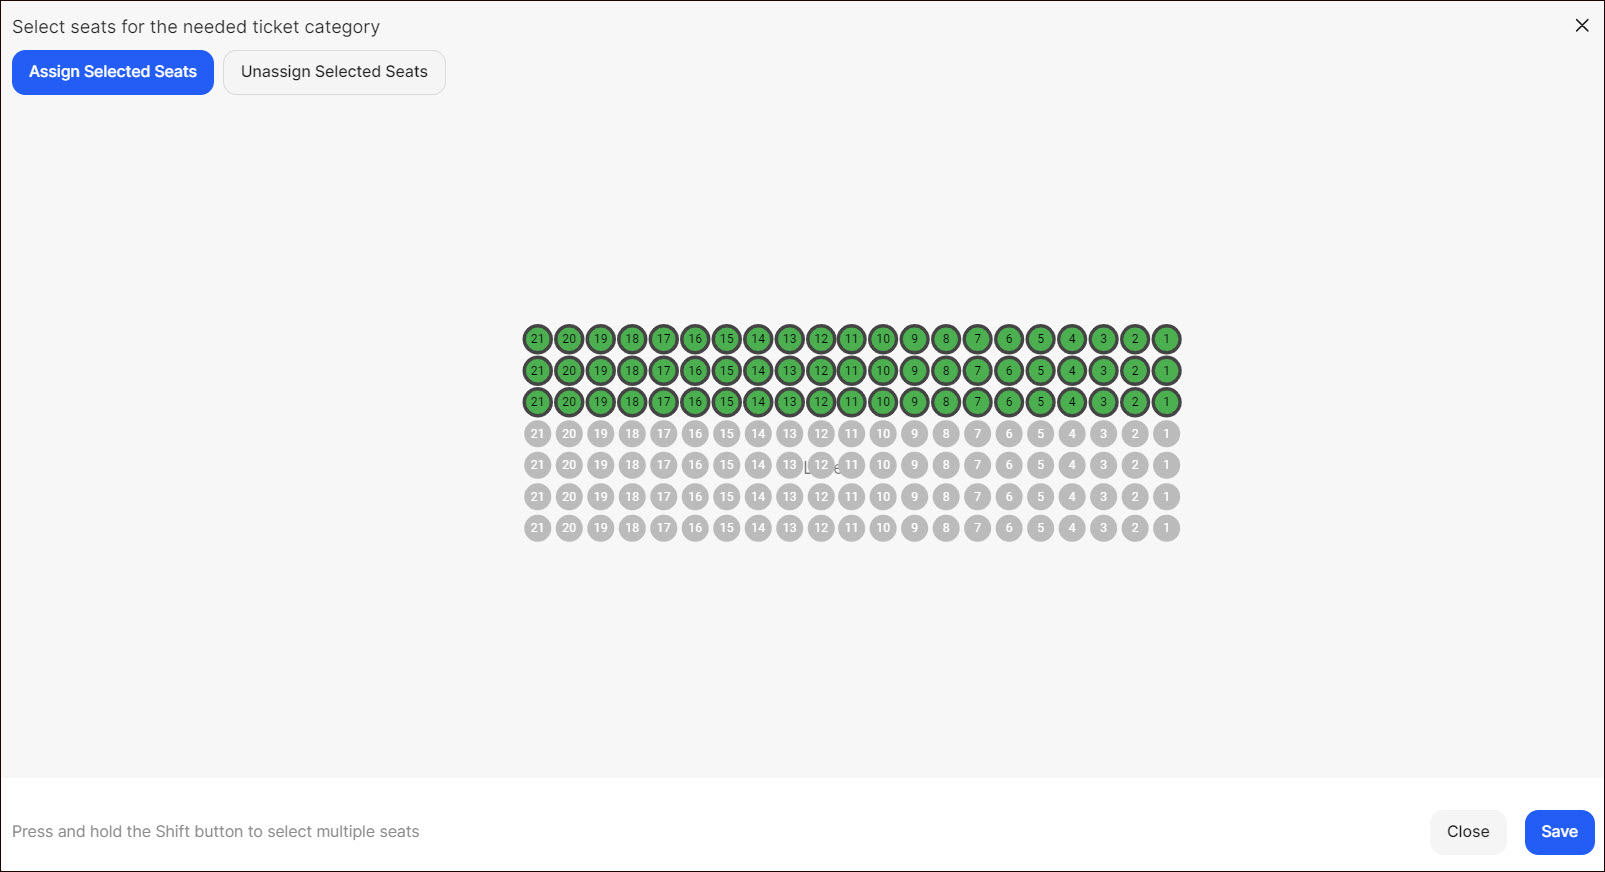
Assigning Seats
You can assign seats to the corresponding tickets based on proximity to the stage and other factors if the event has a schema. Each seat row or table may have a different ticket price. For example, front-row seats or tables may have higher prices than standard seats. This enables you to visualize the available seating options and assists the customers in making decisions when purchasing tickets.
To do so,
- Hover over the corresponding ticket and click Assign Seats.
- Press and hold Shift and select the corresponding seats for the needed ticket category.
- Click Assign Selected Seats.
- Click Save.
Tip: To discard the assigned seats, click Unassing Selected Seats.
Note: When assigning seats to the corresponding ticket type, if the number of selected seats exceeds the initially indicated amount, the ticket number is automatically updated in the Ticket Quantity field.
Setting the Event State
To set the state of the event, select the corresponding state from the right-side drop-down list.
The following options are available:
- Draft: The event is not visible to the customers.
- Active: The event is visible to the customers.

Setting the Event Status
Once the event is saved, you can indicate the current stage of your event. To do so, select the corresponding status from the right-side drop-down list.
The following options are available:
- For Sale: The tickets or registrations for the event are currently available and can be purchased.
- Sold Out: All available tickets or registrations for the event have been purchased or reserved.
- Canceled: The event has been called off or canceled for some reason.
- Postponed: The originally scheduled date for the event has been changed.
After updating the event status to Cancelled/Postponed, your customers will receive an email notification about the cancellation or postponement. You can configure the notifications sent to your customers upon event status changes in Settings > Notifications.
Duplicating the Event
You can duplicate the created event if you want to create a new event based on the existing one. To do so, click Duplicate on the right side of the corresponding product page or select the product from the list, click the Dotted Menu, and select Duplicate.

💡 If you have questions or concerns, contact us directly via the Live Chat box, in the lower right corner. Our Support Team will provide you with top-notch quality support 24/7.