Once a customer places an event order on your online store, the order appears on the Attendees page and you receive a notification to the email address linked to your store. You can track your event orders and your customers attending the event (view detailed information and manage) on the Attendees page.
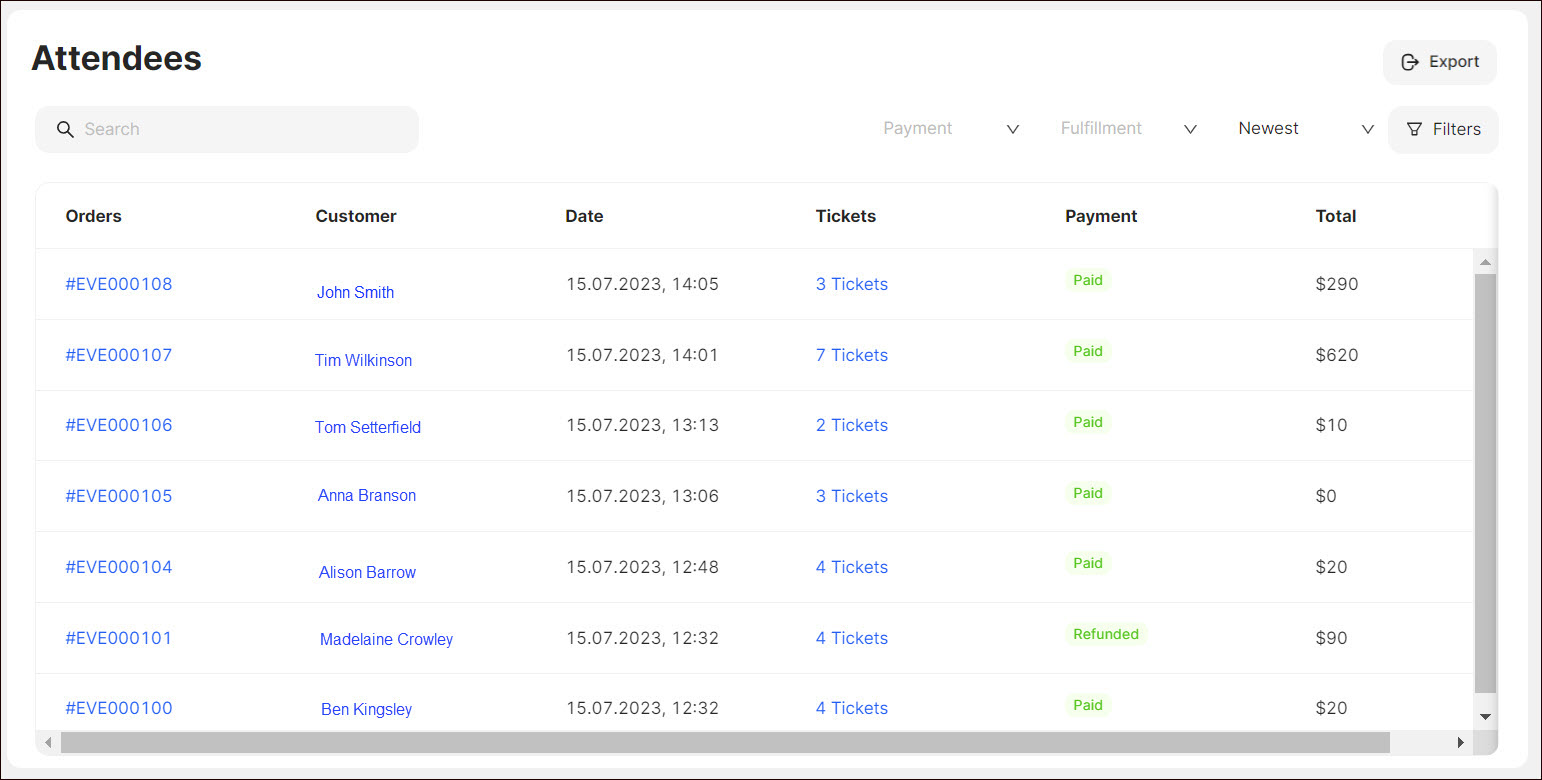
Note: Orders, Customer, and Tickets are clickable links that display corresponding detailed information.
Here you can:
- search for event orders;
- sort the orders according to the payment and creation statuses;
- filter the orders according to the corresponding criteria.
Placing a Test Order
Before managing real orders, it’s important to ensure your store’s ordering process works as expected. You can place a test order for new projects, allowing you to validate system functionality without making actual purchases or using real customer data, ensuring everything is ready before processing live orders.
To do so, click Place Test Order on the Attendees page.
The order appears on the Attendees page and you receive a notification to the email address linked to your store.

Tip: You can place multiple test orders until a real order is received, providing more flexibility during the testing phase. To do so, click Create Test Order on the upper-right side of the Attendees page.

Exporting Event Orders
You can save the event order and ticket information as CSV or XLS files for external use.
To do so:
- Click Export in the top right corner of the page.
- Select the file format in the Export Attendees pop-up window that opens.
- Click Export. The event order and ticket information in the selected file format are sent to your email.
- Open your email and click Download.
Tip: You can export the event order and ticket data based on the searched and filtered results.
Managing the Event Orders
To manage the event orders:
- Click the order ID on your Dashboard.
- Click the Dotted Menu in the right-side corner of the order page.
- Select Print to print or download the order.
- Select View Confirmation to view the order confirmation displayed to your customer.
- Select Resend Order Confirmation and click Resend in the popup that opens to resend the order confirmation to your customers if they have not received their confirmation. Ensure that you have edited the customer's email address in CRM > Customers before proceeding with the resend action if the customer's email has been changed.
- Select Download Tickets and click Download in the popup that opens.
Marking as Attended
Once the ticket holder arrives at the event venue and their attendance is confirmed, you can mark the ticket as attended. This enables you to keep track of the number of people who attended the event, as well as to manage event capacity and gather valuable data for future event planning.
To mark the ticket as attended:
- Go to Events > Attendees on the Dashboard.
- Click the order ID.
- Select the corresponding ticket.
- Click Mark as Attended and confirm in the popup.
Note: Scan the ticket QR code sent to the user in the email confirmation. You will be navigated to the order page, where you can mark the ticket as attended.
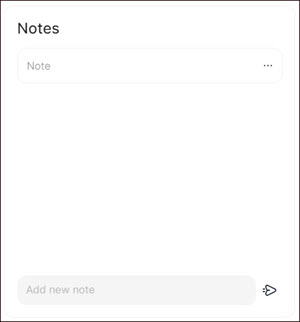
Adding an Event Order Note
You can add a note to every event order you receive. This serves as a reminder or a comment for you or your team members related to the corresponding event orders placed by the customers.
To add a note:
- Click the corresponding order ID.
- Enter the note in the text area in the Notes section.
- Click Send.
Tip: To delete or edit a note, select the note from the list, click the Dotted Menu, and choose the appropriate option.
Processing the Event Orders
Once the event orders are placed, you can track the progress of your orders. Each order goes through a set of states. You can change the statuses of your orders according to the Order Payment Statuses. When the order status is changed, the customer receives an email or SMS notification. You can configure the notifications sent to your customers upon order placement and status changes in Settings > Notifications.
To process orders:
- Click the order ID.
- Click the corresponding button in the top right corner of the page.
Note: When taking an action, you will need to confirm it in the confirmation pop-up window or fill in the corresponding text fields. If you confirm an action in a certain phase or state, you will not be able to reset it.
Event Order Payment Statuses
The following payment statuses are available for the orders:
| Payment Status | Description |
|---|---|
| Unpaid | The customer has chosen the “manual“ payment method (Cash on Delivery, Money Transfer, POS on Delivery). |
| In progress | The order has been placed and the payment is being processed. |
| Paid | The customer has chosen online payment methods (credit cards, mobile payments, etc.) and has successfully completed the payment process. |
| Refunded | The payment has been sent back to the customer (see Refunding the Payment). |
Refunding the Payment
To refund the payment:
- Click Refund in the top right corner of the event order page.
- Provide the information requested in the popup:
- Indicate the quantity of the purchased event tickets that are being returned.
- Indicate the amount of adjustment refund and adjustment fee.
3. Click Refund.
Note: After the payment status is set to Refunded, you have to access your payment system dashboard and manually refund the money.
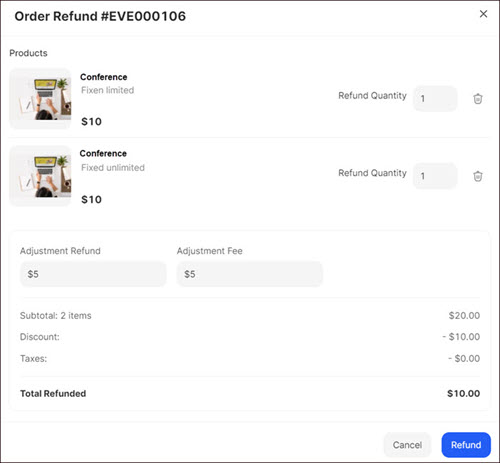
Note: To cancel the event order click Cancel Order in the top right corner of the event order page.
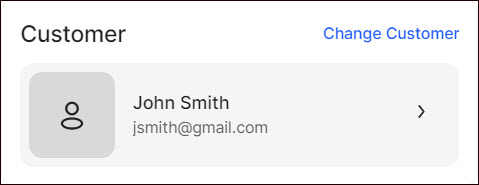
Changing Customers
You can update the customers of the event order if they have completed the checkout process with different contact information. To do so:
- Click the order ID on your Dashboard
- Click Change Customer in the right-side corner of the order page.
- Select the corresponding customer from the list and click Change.
💡 If you have questions or concerns, contact us directly via the Live Chat box in the lower right corner. Our Support Team will provide you with top-notch quality support 24/7.