Navigation pages guide on how to utilize pages: how to access the existing pages and subpages, what types they include, and how to use them in different scenarios. Also, it characterizes the settings of the Pages.
Accessing Pages in the Visual Editor
To access the pages in the Visual Editor:
- Go to the Visual Editor from the left side of the Top Panel.
- Click on Page: Home on the Top Panel.
- Navigate to any available page from the list.

The pages are classified into these tabs:
- Pages: Displays all the web pages created for the project. The Open Pages button below redirects to the Pages section.
- Main: Incorporates standard web pages that you can create for your website, such as About Us, Contact, Services, etc.
- System: Includes the essential utility pages, such as 404, Offline, etc.
- Search Bar: Enables choosing between the multiple pages already created on your website in the Pages section.
- Collections: Accumulates relevant data and applies it on different pages via binding. The Open Collections button below redirects to the Article Management → Collections in the Project Dashboard.
- Ecommerce: Redirects to ready-made Ecommerce pages, such as Physical Product, Category, Empty Cart, etc. The Open Project Dashboard redirects to the overview of the Dashboard.
- Overlay: Displays the overlays (additional content or interactive features), allowing to edit or remove them. The Open button opens the container for customizing the content for the Slide Bar widget.
- Events: Facilitates the management of scheduled events within the platform. The Open button navigates to the Events section on the Dashboard, providing a centralized hub for all event-related activities.
- Bookings: Displays the reservation and scheduling process. The Open button navigates to Booking Products on the Dashboard, where you can access, modify, or manage your bookings.
Navigating to the Pages
The Pages section handles the navigation on your website involving the following categories:
- Main Pages
- System Pages
- Pop-Ups (will be available soon)
The Main Pages are the core of the website structure. After creating pages here, you should add them to the Menu widget to get them displayed on the website navigation bar.
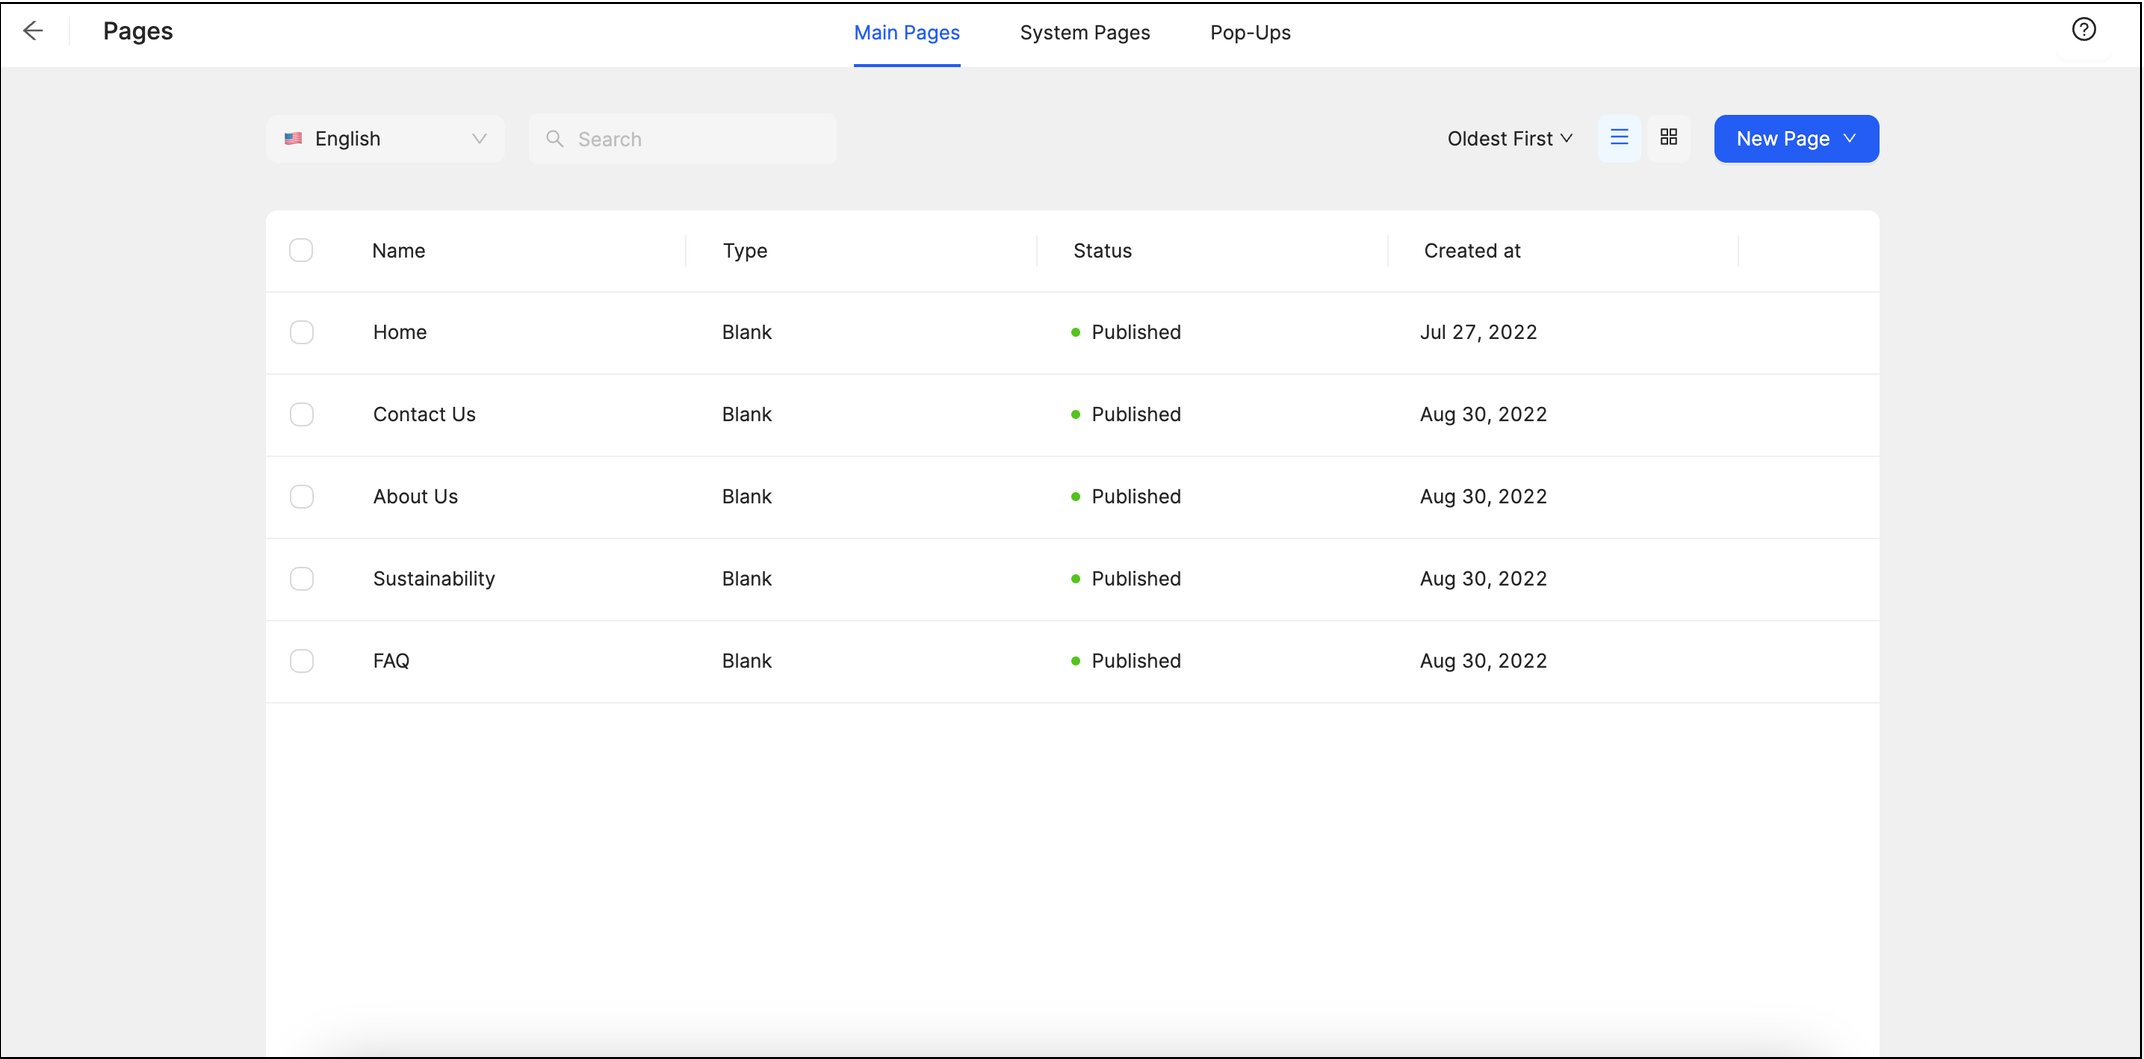
Here you can:
- Switch the language to enable changes to be made to each existing language on your website.
- Search for pages.
- Sort the pages by relevant statuses.
- Display the pages in list view mode.
- Display the pages in grid view mode.
- Create new pages.
Creating a New Page
To create a blank page within the List/Grid type of Layout Preview, press the New Page on the top right corner and choose between a Blank Page or available Page Templates options.
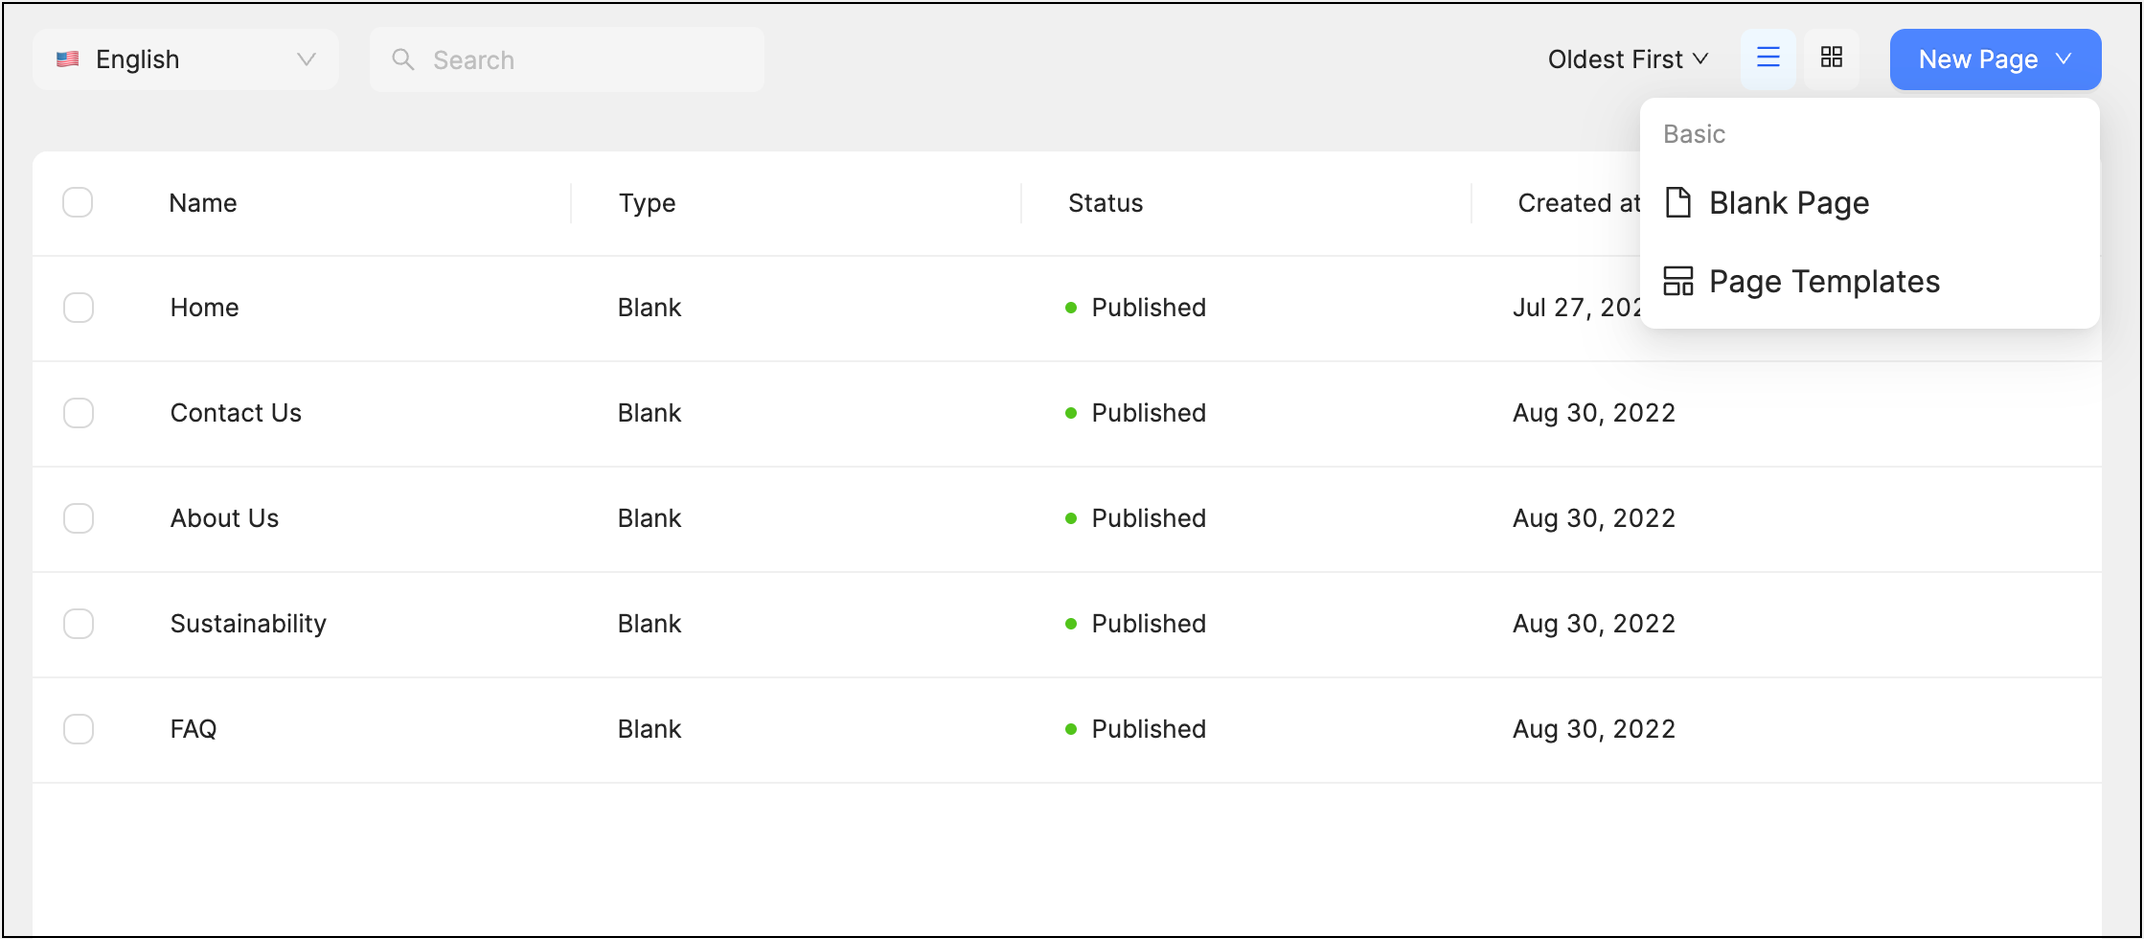
If you choose the Blank Page, you will access the Navigator on the right side with all the necessary information to create the basic structure of the page.
Page Settings while creating a page include:
- Name: Indicates the page name.
- URL: Gets generated automatically from the title name but can be modified.
- Navigation Mode: Determines whether the page should include a Header and/or a Footer or not.
- Sidebar: Specifies the positioning of the sidebar.
- Use Full Height: Allows the sidebar to be displayed at its full height without considering the header and footer positioning.
- Layout Preview: Illustrates the layout structure performed through the modifications mentioned above.
- Publish: Publishes or unpublishes the page.
- Save: Saves the page.
- Cancel: Cancels the action.

After filling in all the necessary configurations, click the Save button or Cancel to discard the changes.
Tip: To create a page in the Grid type of Layout Preview, press the New Page button or else + icon on the left or right of the Page.
To create a subpage under the selected page, use the + icon at the bottom for the Grid type of Layout Preview or the Move to option from the Dotted Menu for the List type of Layout Preview after page creation.

Note: Subpages can be up to five levels.
To create a page from the Page Templates, select one of the options available by pressing Select on the center of the template.
Managing the Existing Pages
To manage an existing page, access the Dotted Menu in the List and Grid of Layout Previews by hovering over the web page.
The options include:
- Preview: Displays your page design.
- Settings: Customizes the options.
- Move to: Moves the page location.
- Save as Template: Saves the page as a template.
Settings
The Page Settings section handles all the page settings and optimizes the web pages in one place. You can switch the language and customize the pages on all languages of your website.

To thoroughly configure your pages, the following sections are available:
General
After completing all the other subsections of the page settings, you can customize several parameters under the General Settings:
- Name: Displays the name of the page you have chosen to apply in the menu.
- URL: Generates the URL of the page.
- Visible To: Indicates whether your page is accessible to everyone (Public) or authenticated users only: both logged-in and logged-out users. Note that if a page is visible to logged-in users only, visitors will be redirected to your Sign In Required page.
- Home Page: Makes your selected page a Home Page.
- Publish: Publishes or unpublishes the page.
- Scan to Preview: Generates a QR code to access the page on the mobile device.
Note: You cannot turn off the Publish toggle unless setting another page as the Home Page. Specifying a Home Page converts the default page into a regular Main Page.
When choosing to publish your page, you will notice a green dot on the page menu, indicating that your page is available to website visitors.
SEO
The SEO (Search Engine Optimization) tab improves your website's visibility in the search engines such as Google or Bing.
This section includes:
- Search Results Preview: Showcases how your webpage is displayed when being searched.
- Title - tells visitors and search engines the name of a webpage. Keep your SEO Title in the optimal length (around 56 characters) to comply with Google's criteria.
- Meta Description: Tells visitors and search engines the summary of the webpage content. Meta descriptions have a length limitation, and they should not be longer than 160 characters to be fully displayed.
- Social Preview: Showcases how your webpage is displayed when posted on social media.
- Replace Image: Hovering over the image allows you to replace it with another one available on the Media app.
- Delete Image: Hovering over the image shows the Bin icon to remove the image completely from the webpage.
- URL: Indicates the alias of the webpage that is crawled.
- Include in Sitemap: Involves the URLs of your pages in your XML sitemap. If this setting is off, the search engines cannot share the information mentioned above with potential website visitors.
- Robots Tag: Informs search engines which page to crawl.
- Index - conducts a search engine to index a page.
- Noindex: Conducts a search engine not to index a page.
- Follow: Conducts a crawler to follow all the links and pass equity to the linked pages even if the page is not indexed.
- Nofollow: Conducts a crawler not to follow any links on a page or pass along any link equity.
Security
The Security tab manages the safety of your pages through the following options:
- Password Protection: Configures password protection for the page.
- Password: Sets a password and enables page password protection.
Managing System Pages
The System Pages display in case of an error occurrence. The following pages are available for customization:
| Page Name | Description |
| 404 Page | Alerts visitors that the page they are trying to reach no longer exists. Redirects users in case of domain deletion. |
| Sign In Required Page | Displays an empty login page, prompting users to sign in. |
| Sign Up Required Page | Displays a page prompting users to sign up for access to specific content or features. |
| Sign Up Page | Displays the registration page for end users to create new accounts. |
| My Account Page | Presents the profile page of the user, showcasing personal account information. |
| Offline Page | Temporarily takes the website offline for users from the Dashboard. |
| Password Protected Page | Enables the creation of protected areas with password-based access control. |
| Terms and Conditions Page | Generates and displays the terms and conditions of the website. |
| Privacy Policy Page | Details how the website collects, handles, and processes customer data. |
| Cookie Policy Page | Informs users about the website's use of cookies, and their types, and provides guidance on managing them. |
| Forgot Password Page | Provides a means for users to recover their forgotten passwords. |
| Reset Password Page | Allows users to reset their passwords to regain account access. |
| Shipping Page | Offers information about the shipping process and options available for orders. |
| Return and Refund Page | Provides details about the return and refund policies for purchased items. |
| Search Page | Enables users to search for specific content or items within the website. |
You can continue customizing the System Pages with the Dotted menu available while hovering over them with two options: Preview and Settings.
- Preview: Visualizes how the page appears on desktop, tablet, and mobile devices.
- Settings: Customize General, SEO, and Social aspects of your page.
- General:
- Name: Sets the name of the page.
- Publish: Publishes or unpublishes the page.
- Scan to Preview: Generates a QR code to access the page on the mobile device.
- General:
The SEO tab is identical to the Main Pages.
💡 If you have questions or concerns, contact us directly via the Live Chat box in the lower right corner. Our Support Team will provide you with top-notch quality support 24/7.